
Background
Every now and again I find myself needing to network a couple machines. But not often enough where I can remember every step off the top of my head. These are my notes for networking my Mac to a Linux box I run headless, including basic SSH and firewall configurations.
IP Address (Remote)
I'll start with my Linux machine running Ubuntu 24.04. Because there isn't an SSH server installed by default (openssh-server), I'll plug in a keyboard, mouse and monitor until we make that service available.
The first step is to create a Netplan config file containing information about our network setup, interfaces and IP addresses. This file will live in /etc/netplan/. Whereas with .nmconnection files we generally prefix the file with the interface (e.g. enp0s0.nmconnection), here we can use the role of the file (##-networkname.yaml). Furthermore, we prefix with an integer indicating the priority of the network policy with "01" commonly being used for default policies. The higher the number, the greater the priority.
# /etc/netplan/10-direct-ethernet.yaml

network:
  version: 2
  renderer: NetworkManager
  ethernets:
    <interface>:  # e.g., enp0s0, enp3s0 — find with 'ip link show'
      dhcp4: no
      dhcp6: no
      accept-ra: no
      link-local: []
      addresses:
        - 192.168.50.10/24
This article is meant for quick reference but I'll hit these values quickly:
- We use
version: 2because it's currently the only supported value. - The renderer is specified as
NetworkManagerbecause I'm on Ubuntu Desktop and that's the default option. If this was a server, I'd likely usesystemd-networkdinstead. - We specify the interface under
ethernetsbecause I'm establishing an ethernet connection. If this was a WiFi connection you would usewifisand you'd need to provide credentials (access-points). Find your interfaces and their respective status withip link show. Replace<interface>with the actual interface name. - The
dhcp4,dhcp6,accept-ra, andlink-localproperties are structured for a network without a DHCP server. - Last, we specify the IP address and subnet information for this machine in CIDR format telling us we have an IPv4 address of
192.168.50.10with a Network Address of192.168.50.0a Broadcast Address of192.168.50.255, and a Subnet Mask of255.255.255.0.
With the Netplan config file established, we're ready to activate the network. First I like to run try or generate first as a sanity check before running apply.
# check for syntax errors
sudo netplan generate  # will raise exceptions
# same thing, but has a built-in rollback/timeout mechanism
# sudo netplan try

# if all is well, bring the configuration live
sudo netplan apply
After running these commands, we'll find that a .nmconnection file was created in /run/NetworkManager/system-connections/.
ian@skynet:~$ ls -l /run/NetworkManager/system-connections/
total 12
-rw------- 1 root root 314 Feb 11 11:04 lo.nmconnection  # loopback connection
-rw------- 1 root root 168 Feb 11 11:04 netplan-enp0s0.nmconnection  # what we applied
# my wifi connection etc...
If we want to take down this network connection, we delete the Netplan config and run apply once more, not the .nmconnection file.
rm /etc/netplan/10-direct-ethernet.yaml

sudo netplan apply

ian@skynet:~$ ls -l /run/NetworkManager/system-connections/
total 12
-rw------- 1 root root 314 Feb 11 11:04 lo.nmconnection
IP Address (Local)
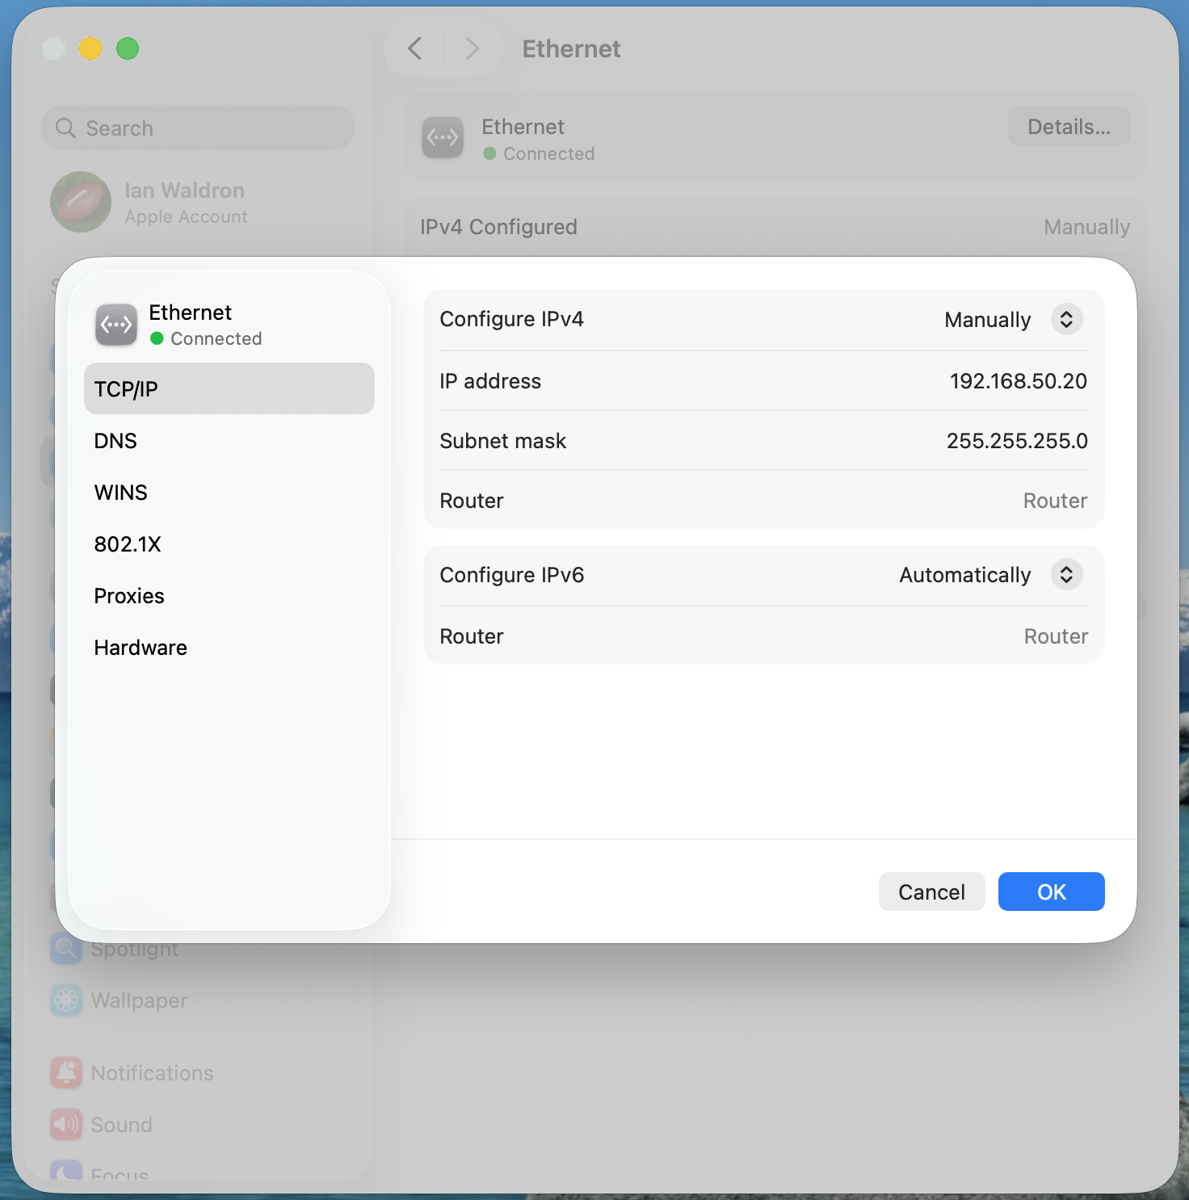
Next, we'll configure the IPv4 address of the Mac on the subnet. This is easily accomplished through the interface located at "Settings > Network," select the interface (probably "Ethernet" if you're plugged into the ethernet adapter), and click "Details." On the "TCP/IP" tab set "Configure IPv4" to "Manually" and enter values for the "IP address" and "Subnet mask" fields. I'll increment the IP address by 10 from what we used for the remote: 192.168.50.20.
IP Assignment Conventions
If one machine on a subnet has a server-type role (headless, etc.), I assign the lowest host value to this machine (10 in our case). Then clients are incremented from there as they're added to the network (20, 30, etc.). If no machine has a particular role that stands out, assign at your discretion.
Select "OK" and we're done.
Test Connections
With our networks configured in both directions, these machines should be visible to one another. Starting from the Mac I'll ping the remote.
ianwaldron@Ians-Mac-mini ~ % ping -c 3 192.168.50.10
PING 192.168.50.10 (192.168.50.10): 56 data bytes
64 bytes from 192.168.50.10: icmp_seq=0 ttl=64 time=0.627 ms
64 bytes from 192.168.50.10: icmp_seq=1 ttl=64 time=0.581 ms
64 bytes from 192.168.50.10: icmp_seq=2 ttl=64 time=0.658 ms

--- 192.168.50.10 ping statistics ---
3 packets transmitted, 3 packets received, 0.0% packet loss
round-trip min/avg/max/stddev = 0.581/0.622/0.658/0.032 ms
And then let's test the remote can see the Mac.
ian@skynet:~$ ping -c 3 192.168.50.20
PING 192.168.50.20 (192.168.50.20) 56(84) bytes of data.
64 bytes from 192.168.50.20: icmp_seq=1 ttl=64 time=0.237 ms
64 bytes from 192.168.50.20: icmp_seq=2 ttl=64 time=0.227 ms
64 bytes from 192.168.50.20: icmp_seq=3 ttl=64 time=0.415 ms

--- 192.168.50.20 ping statistics ---
3 packets transmitted, 3 received, 0% packet loss, time 2061ms
rtt min/avg/max/mdev = 0.227/0.293/0.415/0.086 ms
Good connections, great!
As a side note, we're also able to ping these machines using the hostnames they broadcast using the .local reserved domain because Mac has Bonjour installed by default and Ubuntu has Avahi enabling mDNS hostname resolution.
ianwaldron@Ians-Mac-mini ~ % ping -c 1 skynet.local
PING skynet.local (192.168.50.10): 56 data bytes
64 bytes from 192.168.50.10: icmp_seq=0 ttl=64 time=0.524 ms

--- skynet.local ping statistics ---
1 packets transmitted, 1 packets received, 0.0% packet loss
round-trip min/avg/max/stddev = 0.524/0.524/0.524/0.000 ms
SSH
With a good network connection, we're ready to set up SSH. The Mac is ready to go out of the gate for outbound SSH connections. For the headless rig to receive connections, however, we need to configure openssh-server.
sudo apt install openssh-server

# then we can confirm it's running with:
systemctl status ssh
Back on the Mac we're ready to copy an SSH public key over to the remote.
ssh-copy-id ian@192.168.50.10

# if you don't already have a key generated:
# ssh-keygen -t ed25519
Follow the prompts to add the public key to the authorized_keys file on the remote and we'll be good to go.
At this point we no longer need the keyboard, mouse, and monitor connected to the Linux machine. We can finish the configuration entirely over SSH.
Lock-Down SSH
It's also good practice to lock down SSH to public key authorization only (disable password authentication) and disable root login. We'll SSH into the remote and update that configuration.
sudo nano /etc/ssh/sshd_configLook for the following and configure accordingly (they won't be consecutive):
PermitRootLogin no
PubkeyAuthentication yes
PasswordAuthentication no
PermitEmptyPasswords no
And now SSH should be in a good spot.
Firewall
Last but not least, we'll lock down the remote machine by enabling the UFW firewall shipped with Ubuntu out of the box. The firewall isn't enabled by default. We know this because we have an active SSH connection to the machine. If the firewall were active, the incoming connection would have been dropped.
Default rules for UFW look like:
Default: deny (incoming), allow (outgoing), disabled (routed)All incoming connections are dropped by default. Therefore, we want to add a rule for incoming connections to port 22 for our particular machine
ian@skynet:~$ sudo ufw allow from 192.168.50.20 to any port 22
Rule added

# alternatively add the subnet as a whole if we want other
#   machines on the same subnet to have access
sudo ufw allow from 192.168.50.0/24 to any port 22
Now we enable the firewall.
ian@skynet:~$ sudo ufw enable
Command may disrupt existing ssh connections. Proceed with operation (y|n)? y
Firewall is active and enabled on system startup
Risk of lockout!
If you enable the firewall prior to allowing SSH on port 22 you will lock yourself out!
And there you have it. We're now set up to only allow incoming connections from the Mac on our particular subnet and only on port 22 (SSH).
Final Thoughts
Networking a Mac and a Linux machine is a relatively simple task. However, there are a number of steps to check off and considerations to make. This has been a short discussion on how to make a point-to-point connection between a Mac and a Linux machine, including establishing SSH and a basic firewall.
You don't need to memorize the process but it's good to have a general familiarity. As AI consumes more and more of the application layer, understanding how the pieces fit together and making machines talk reliably and securely will be an increasingly important role for the software engineer.